Feeds:
Posts
Comments

Archive for the ‘Uncategorized’ Category

I don’t usually go in for things that are a faff to make, and there is no denying these (or anything using filo pastry) are a faff to make. But occasionally, on a quiet weekend it is nice to have an activity that consumes your mind and takes your mind off whatever it was on.

Spinach and feta filo parcels

These are not really difficult to make and once you get the hang of it you can create all sorts of flavour fillings if you are feeling creative (see below). You can also make samosas with this technique, just make a spicy Indian filling, wrap and maybe sprinkle with some black onion seeds before baking.

The filling for these is distinctly Greek in style – much like the filling of a Spanakopita (a Greek filo pie). They are delicious warm from the oven but they are also nice cold as a lunchbox snack. You can also freeze them and take them out and cook through in the oven until hot again. They keep for a few days in an airtight container and can be popped back in the oven for 5 minutes to give them an air of warmth before eating.

Although they take some time to make I think these parcels make a very pleasing display for a buffet, picnic or relaxed lunch for friends and family.

Makes 12-15 filo parcels

500g spinach

100 feta cheese

1 egg

½ onion, finely chopped

1 small garlic clove, finely chopped

Pinch of ground coriander

Salt and pepper

1-2tbsp of grated parmesan

Knob of butter, melted for brushing

1 pack of frozen filo pastry (like Just Roll from the supermarkets) Defrosted.

Method

1. Sweat the onion and garlic slowly in a pan with some butter until soft and then set aside.

2. Cook your spinach in batches in a pan with a lid clamped on until just wilted. Take it out and put in a sieve where you can squash out all of the water. Set aside to cool.

3. Once the first two elements are cool you can mix them together with the crumbled feta, the coriander, seasoning, parmesan and the beaten egg. That’s your filling (at this stage add anything else you wish, a handful of toasted pine nuts would make a nice addition. As would fresh herbs such as mint and parsley).

4. Take the filo carefully out of its packaging and cut into about 7cm wide strips, cover with a damp tea towel or some cling-film to stop it drying out.

5. One at a time brush a sheet gently with the melted butter, being careful not to tear the pastry. Put a heaped teaspoon of the mixture at the bottom of the sheet, a few centimetres from the edge. Fold one corner over so it meets the other side (so you can see a triangle), repeat folding alternate ways until you have used all the pastry and have a triangle parcel left. Brush with melted butter and place on a baking tray.

6. Continue with the next sheets until all the filling has been used up. Bake in a preheated oven at 180 degrees/ Gas 4 for about 30 minutes, until the pastries are golden and crisp.

7. Resist the temptation to eat immediately, they will be molten inside. They are actually much nicer warm or at room temperature.

Try substituting the spinach for Swiss chard or use 300g spinach and 200g lemony leafed sorrel. Add fresh herbs or some spices like cinnamon to the filling for an exotic touch. Feta can easily be substituted for goat’s cheese or another strong cheese. You could even put left-over roasted lamb into these with feta and herbs if you had some. A friendly Tweeter – Daniel Ingram, head chef at The Red Lion in Cricklade – creatively pointed out that you could also do sweet versions of filo parcels, which I think is a fantastic idea. His suggestions included stewed apples, or banana and caramel with cardamom sauce. I think this is enough suggestions for you to be getting on with.


Read Full Post »

Ginger and sesame rice with poached chicken

The thing I find most interesting about this recipe is that it is at once punchy and fresh but also warming and hearty – an unusual mix. I rarely think of Chinese dishes as comforting or hearty – attributes you might usually associate with British cooking. Quick-cook stir fries, spicy noodle salads, steamed meat and fish dishes are light, fresh Chinese dishes.

But this simple, homely recipe by Bill Granger really does marry these two aspects together and it is the perfect weekday meal for any time of year. The rice absorbs the stock and flavours almost like a risotto becoming soft and delicious. But the raw spring onion and chilli scattered on at the end really add some zing.

It is also healthy and low-fat (not that I’m suddenly the health police, as many of my recipes show), but I think it’s always pleasing when a meal is both tasty and good for you – we all need to look after ourselves now don’t we?!

Serves 2 (very comfortably)

Recipe adapted from Bill Granger, Holiday

1tbsp sunflower

1tsp sesame oil

½ large white onion, finely chopped

2 garlic cloves, finely chopped

1tsp freshly grated ginger

200g Jasmine rice

400ml Light chicken stock (can use an organic stock cube)

2 small chicken breasts cut into thin fillets

2 very finely sliced spring onions

Some chopped red chilli

Soy sauce

Method

Heat the two oils in a large, deep frying pan (that has a tight fitting lid) over a medium heat. Add the onion and cook slowly for 5-6 minutes until soft. Add the garlic and ginger and cook for a couple more minutes.

Add the rice and stir to coat. Add the stock and bring to the boil. Cover and reduce the heat to low and simmer for five minutes. Place the chicken pieces on the top of the rice in a single layer, cover again and simmer for a further 10 minutes or until the rice is tender and chicken is cooked through. Use your watch and try to resist the temptation to keep lifting the lid and look – you will lose the steam and heat which poaches the chicken.

Remove from the heat, leave the lid on and allow to stand for a further five minutes. Serve sprinkled with spring onion and chilli and drizzle with a little soy sauce.

Read Full Post »

A meal made with fresh, expensive, top quality ingredients will likely taste divine, but surely there is nothing as satisfying as making a tasty dish out of the odds and ends in your fridge that were destined for the bin if they had of been left a day longer?

It’s not just the fact that it is fantastically frugal and reduces waste, but also the surprise you get when you end up with a truly delicious recipe – a recipe you may never have cooked if you hadn’t of rescued those ingredients that day.

Something out of nothing salad

I’ve said it once and I’ll say it again, you must visit the website Love Food Hate Waste, to both learn about the amount of food we waste in this country every year and to get hundreds of tips for how to stop wasting food in your own home. Nearly everything that you would once have considered throwing away could and should be eaten or mixed with other items to create a lunch or even a whole dinner.

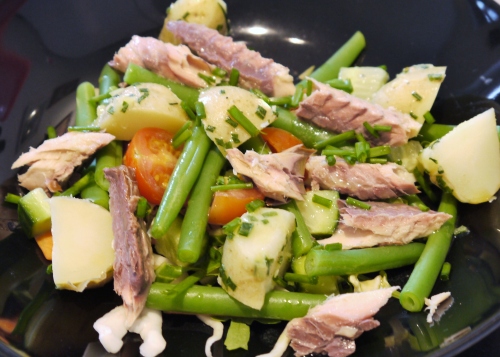
Crunchy vegetable and mackerel salad

This fresh and tasty salad was made with reducing waste in mind. A few beans from a full pack left languishing, a few soft tomatoes, a tiny handful of mixed salad leaves, a few chives and some cooked new potatoes from the previous night’s dinner left in the fridge. A rummage in the store cupboard unearthed a can of mackerel in sunflower oil that gave me the perfect protein source to hang the whole salad around. With the green beans blanched and cooled and everything else chopped into edible sizes it was a matter of making a peppery dressing with olive oil, Dijon mustard, honey and lemon juice with salt and pepper. It was very much like a Nicoise salad and if I hadn’t found the mackerel I would have boiled an egg and added that instead.

Pan-fried caramelised apples with cinnamon

Similarly we always seem to have a few, slightly worse for wear, apples in the fruit basket at the end of the week. My most recent way to enjoy this potential waste is to slice the apples into wedges and pan fry in a large knob of butter (real butter). Once they start getting golden add a shake of sugar and a tiny pinch of cinnamon, move about to coat the wedges and then cook until they start to caramelise. Serve on top of plain natural yogurt or vanilla ice-cream. You could omit the cinnamon and use vanilla sugar instead or consider adding a slug of alcohol.

There is never an excuse to throw food away, you’ll be amazed the delicious meals you can make with a little bit of imagination.

Read Full Post »

Ok, so pimped up is really just trying to make this sound a little bit special. In fact there are just a few subtle additions to the traditional recipe, notably herbs in the mash and cheese on the top, plus plenty of wine in the meat and fresh thyme for depth of flavour.

I must admit I am not a fan of my homeland food, I rarely cook anything you could call traditionally British and I wouldn’t even buy a pasty or a pie out. When you realise you can make a fantastic, flavour-packed dish in 20 minutes using some simple Chinese and Thai ingredients it is hard to force yourself to whip up a fatty Yorkshire pudding batter for toad-in-the-hole or tackle pastry for a big meat pie.

Equally with pasta so goddamn easy to throw together on weekdays why make stew and dumplings…..I could go on. Having said all that, on some cold, dark nights there is really nothing that can make you feel as comforted as a meal that includes piles of creamy mashed potato, or rich meat and warm gravy. You’ve got to give it to us Brits – we do stodgy food down to a tee.

Pimped up Cottage Pie

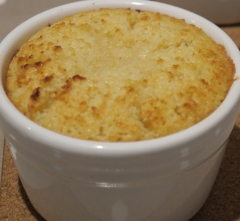
This Cottage Pie is one of those very meals I speak of and with winter still upon us it is the perfect time to cook it. There is no reason why you should try and reduce the size of this to feed two people, it just isn’t worth the hassle. If you are going to go to the bother of cooking this you may as well have enough to freeze for another occasion, so I recommend cooking this 4 person dish.

Pimped up Cottage Pie

Serves 4

1 onion, finely chopped

2 sticks of celery, finely chopped

2 carrots grated

1 garlic clove, finely chopped

4/6 mushrooms, cubed up

500g beef mince

1tbsp tomato puree

1 large glass of red wine

1x 400g can of chopped tomatoes

200ml beef stock

800g – 1kg potato, peeled and cut into large chunks

Fresh herbs (basil, chives and parsley) finely chopped

Two handfuls of grated cheddar cheese

 Method

1. Gently fry the onion, celery and carrots in a deep frying pan that has a lid for 10 minutes until softened (I find it helps to put a lid on to create steam to soften them). Add the garlic and cook for a further two minutes

2. Turn the heat up and add the beef, fry until browned all over. Add the tomato puree and cook off in the pan for a few minutes.

3. Pour in the red wine and it let bubble up a minute, then add the canned tomatoes and stock. Throw in the mushrooms, a bit of fresh or dried thyme and the mushrooms. Stir, season and leave to simmer for an hour.

4. For the mash; boil or steam your potatoes until soft. Heat some butter and milk in a pan and mash the potatoes with it. Throw in the herbs and mixed until creamy.

5. Put the meat into a deep dish and spread the mash on top – make sure the top isn’t too smooth. Sprinkle on the cheese and place in a pre-heated 180 degree (Gas 6) oven for 30-40 minutes until the underneath filling is slightly bubbling up and the top is golden and crisp. Serve with a pile of peas from the freezer, or some seasonal vegetables.

Read Full Post »

Sometimes called impossible pies, these little puddings are made using one cake mix that is poured into a ramekin and baked until the finished article is springy and spongy on top and there is a gooey, rich sauce underneath.

Little lemon self-saucing puddings

I always struggle with desserts because recipes on most occasions cater for a minimum of four people, and if you are talking about a cake or tart then it will likely serve 10 to 12 people. Now there is no problem with having delicious left-overs but really, do two people need to eat 12 slices of apple tart or banoffee pie in the space of three days? Personally I think not.

This recipe is exactly enough for two little pies, so you can have your indulgence on the weekend with no fear of wasting left-overs. They are sharp and tangy, but not too tart. The sauce at the bottom is very similar to a lemon curd (and be careful not to eat them straight from the oven, or prepare to burn the top of your mouth on the molten sauce!) And since I am writing this in January consider adapting and making this into a Seville orange pudding.

The recipe idea came from a lemon and coconut pie by Australian food writer Donna Hay, who does fantastic simple home-style food, and I have adapted it here.

I have made a point to put crème frachie in the title of the post because I feel it is an important part of the dish, but if you don’t have any it is not essential, or you could use cream or even plain yogurt. Cream fraiche does, however, cut through the rich sauce and sweet lemon flavour of the pie perfectly.

Serves 2

Little lemon pudding

110g caster sugar

2 rounded tablespoons of self-raising flour

25g ground almonds

1/2tsp baking powder

Grated zest of one lemon

60ml lemon juice

15g melted butter

80ml milk

1 medium egg

Method

1. Preheat oven to 180C/Gas 4 and butter two ramekins. Place sugar, flour, almonds and baking powder into a bowl and mix. In a separate bowl whisk together by hand the lemon rind, juice, butter, milk and egg. Add the wet ingredients to the dry and stir until thoroughly mixed, I use a balloon whisk, but you don’t really need to beat this.

2. The mix will be much thinner than a sponge mix, so don’t panic. Pour into your ramekins and bake for 20 minutes until the tops are golden, but you can feel it is squidgy underneath. Allow to sit for 5-10 minutes before digging in and top with a big blob of crème fraiche.


Read Full Post »

In a way want to say this is a seasonal meal, but I don’t really mean seasonal in the sense of the vegetables in it, as there are actually tomatoes in it and then just an onion. What I mean is that it fits in well at this time of year, very much like a pie or a stew. It is warming and filling and heavier than summer food.

I know this is Spanish in style, and Spain says sunshine and summer, but I like this more in autumn and winter rather than spring and summer. All you really need is a hunk of crusty bread to soak up those red-stained juices and that’s your meal. Although you could add some wilted kale alongside if you wanted or a green salad if you feel you need the nutrients – and lord knows everyone seems to want lots of nutrients in January. February and we will all be back to biscuits and desserts I am sure.

Spanish chorizo and bean stew

It is best to use cooking chorizo, as it will be softer once cooked, if not it will work with a cured version, but it certainly won’t work with salami style slices of chorizo I am afraid. This is a very flexible recipe, you don’t need to stick closely to the quantities, just see how you feel. You could add some red chilli at the garlic stage and swap butter beans for the cannellini if that’s what you have to hand. Fresh parsley would make the dish look pretty if you were serving guests.

Spanish chorizo and bean stew (Serves 2)

150g of chorizo, sliced into fat rings

1 white onion, finely chopped

2 garlic cloves, finely chopped

2-3 large tomatoes, roughly chopped (with all the seeds and juice)

1/2 tsp of smoked sweet paprika

1 400g can of cannellini beans

1. Heat a small amount of olive oil in a pan and fry the chorizo gently for a minute or two until the red oils start oozing out.

2. Add the onion and cook for 5 minutes until soft. Add the garlic and cook for a couple of minutes more.

3. Turn up the heat and add the tomatoes and simmer for 5 minutes until the juices reduce a little. Add the paprika and a splash of water.

4. Finally add the beans, stir and place the lid on. Allow to warm through for 5-10 minutes on a medium head. In this time the flavours should all mingle and the beans get covered by the chorizo oil.

5. Serve in bowls with any juices from the pan and bread to mop it up with. Really I feel a glass of red wine is necessary with this.

Read Full Post »

There are some who will say soup does not make a dinner, certainly not an evening meal, but I have to dispute this. Anyone who has read this blog before will know that the two people behind Food4two, me and my partner (who doesn’t cook, just eats) are big eaters and when I serve up this soup for dinner it is more than enough to fill up my greedy man with hollow legs and a bottom-less stomach.

I grant you, you will need some good crusty bread to go with it, but that is all. I know it’s an over-used word in food writing, but this is truly the definition of a hearty soup. Pureed soups for evening dinner somehow don’t cut it – more like a drink than a meal really.

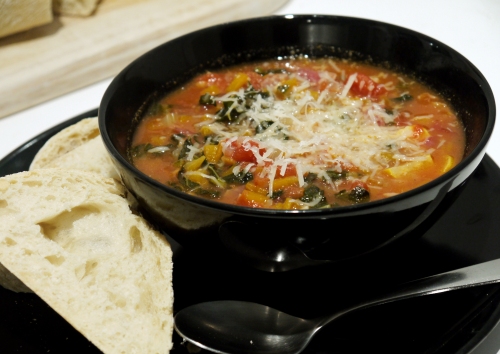
Chunky vegetable and bean soup with parmesan

This, however, has small chunks of salty pancetta, root vegetables, strands of kale and filling, protein rich beans in it. This is my favourite soup of all time, packed with flavour, simple to make, easy to adapt to the seasons and all using ingredients you may find in your store cupboard. If you have a rind of parmesan in the fridge (or stashed in the freezer, which you can do) then put it in during the simmering stage to imbue the liquid with its savoury flavour then remove it before adding the greens and beans. This amount is plenty for two people, often with a portion left for lunch the next day.

Chunky vegetable and bean soup with parmesan

10 slices of pancetta or around 70g of pancetta cubes (which you get in packs from the supermarket)

1 red onion, finely chopped

3 celery sticks, finely diced

2 large or 3 medium carrots, finely diced

2 cloves of garlic, finely chopped

400g canned tomatoes

500ml chicken stock (if not using fresh stock, use a good cube like Kallo Organic chicken stock cubes)

1tsp Dijon mustard

400g can of cannellini beans

Large handful of cavelo nero, shredded (or spinach, kale, chard or Orach leaves)

Parmesan, for grating on the top

 Method

1. Fry the pancetta in a small amount of olive oil in a large saucepan until starting to crisp. Add the onion, carrot and celery, stir and place the lid on to allow the vegetables to soften. This will take about 10-15 minutes, take the lid off and stir regularly.

2. Add the garlic and cook for a further 2-3 minutes. Then add the canned tomatoes, mustard and hot stock. Stir and cook with lid half-covering the pan for 15 minutes. Taste and season with salt and pepper.

3. Add the beans and the cavelo nero and cook for 5-10 minutes more, if you are using spinach or chard it will take less time as the leaves are more tender. In summer you could add chopped courgette and chopped up French beans instead of kale.

4. Serve in deep bowls, sprinkled with grated parmesan and crusty bread on the side.


Read Full Post »

A delicious, cream filled cake it a wonderful thing, but I am afraid it can only be described as a treat and whilst I’d love to take a slice of homemade sponge to work for lunch every day I’m not about to start and I wouldn’t recommend you do either.

A flapjack or energy bar, that is a different matter. Yes indeed it is made with butter and sugar, so it is by no means completely healthy but it is full of slow release energy oats, mineral rich nuts, seeds and dried fruit. It feels altogether more wholesome, more nutritious and less guilt-ridden.

Fig and pumpkin seed bars

I regularly make some form of oaty energy bar for me, but mainly for my other-half who has a physical, outdoors job and eats an enormous amount of food.

I’ve tried A LOT of recipes for various flapjacks, all of which fell a little short, either tasting more like dried cardboard than a tasty snack or being a bit too decadent to really pass off as a daily healthy bar.

This recipe by Nigel Slater, which I ripped out of the Observer Food Monthly magazine last year is by far the very best (not at all what our receptionist at work would describe as ‘a snack for sandal-wearing, yoghurt eating hippies’ – her words not mine!)

It is bursting with fruit, oats, seeds and nuts, but I think it is the addition of ground almonds in the mix that turn this into a delicious moist energy bar, rather than a dry and over-sweet flapjack.

I have found it an infinitely adaptable recipe. I have on many occasions swapped the dried figs for dried apricots, in which case I decrease the amount of sugar by 20g because they are sweeter. I mostly use cranberries instead of sour cherries, because I usually have a bag knocking about and sometimes when I have found I do not have maple syrup I have used honey instead – not quite as a good but not a bad substitute.

These are so simple to make and they will last all week in a air-tight container, they are well worth a try.

Fig and Pumpkin Seed Bars

(Nigel Slater)

Makes 12

60g walnut halves

70g soft-dried figs

40g sour cherries

30g pumpkin seeds

200g porridge or rolled oats

35g ground almonds

100g butter

100ml maple syrup

90g caster sugar

24cm square baking tin, either grease or lined with parchment

1. Preheat oven to 160 degrees-gas 3. Roughly chop walnuts, figs, pumpkin seeds and cherries. The rougher the chopping the more crumbly the bars will be.

2. Mix with the oats and almonds.

3. Melt the butter in a saucepan with the sugar. Add the maple syrup and when it gets to a rolling boil take it off the heat. Tip the dry ingredients into the pan (or tip the liquid into the bowl of dry ingredients if you prefer) and stir together.

4. Tip into your tin and press down firmly with a spatula. Bake for 20-25 minutes until golden.

5. Allow to cool completely before cutting into 12 bars.

Enjoy as a mid-morning snack, an afternoon pick-me-up, a healthy treat for children, or if there are crumbly bits left in the tub at the end of the week, sprinkle over yoghurt for breakfast.

Read Full Post »

Fellow food blogger and Bristol based foodie, writer and campaigner Elisabeth Winkler sent me copies of two books she co-wrote knowing I was not only a passionate cook, but a keen amateur vegetable gardener.

Two growing and cooking books

The books ‘Make more of Squashes’ and ‘Make more of Peas and Beans’ blend growing tips with delicious vegetable recipes. This year must say I found the peas and beans book the most useful, having some out-of-control French and runner bean plants that have showered me in their bounty, whilst the squashes are still looking pitiful. Thankful as I am for the copious amounts of beans, and I really am, we all get to the stage when we run out of both inspiration and, quite frankly, patience. No, I cannot be bothered to blanch and batch freeze any more runner beans. Besides there is no room in the freezer and I am not sacrificing the space for the ice-cream.

So these two little books step in to give you the ideas and inspiration to use all your harvest in a whole range of dishes.

In the peas and beans book I enjoyed ‘broad beans with cream and herbs’, which I served alongside some roasted salmon and new potatoes. It involved frying a little garlic in butter, adding some crème fraiche and double cream then podded broad beans and some fresh chopped, mixed herbs.

Salmon with broad beans in cream and herb sauce

From the squash book I have discovered highly addictive squash chips, which need to be rubbed in oil and the Moroccan spice mix ras-el hanout before being baked. Totally delicious.

The growing section is simple and bursting with excellent advice for how to start your plants off from seed, which varieties to choose and how to care for them. I particularly liked the ‘cost-cutting’ section, full of nifty, thrifty tips such as collecting yoghurt containers to use as seed pots or growing courgettes in large coffee bean sacks.

The squash book includes recipes for all the vegetables in the same group, which includes courgettes, cucumbers and melons. Enjoy spicy squash couscous, pan-fried cucumber with garlic and chilli or courgette cake.

Whilst Make more of Beans and Peas includes spiced pea soup, summer vegetable pasta, oriental-style mangetout or warm Greek salad of runner beans. Inspiration to keep you cooking all the way through the growing season.

For more details visit http://www.amazon.co.uk/Make-More-Squashes-Vegetables/dp/1906316376

Read Full Post »

I would put chorizo in the ‘super ingredient’ category, owing to the fact that it seems to make any dish taste fantastic – imbuing it with the feisty paprika and pork flavour. Of course this Spanish ingredient doesn’t go with everything, but it can pep up a chilli con carne or give a wonderful savoury taste to a soup. It is a must in a paella and on the tapas table.

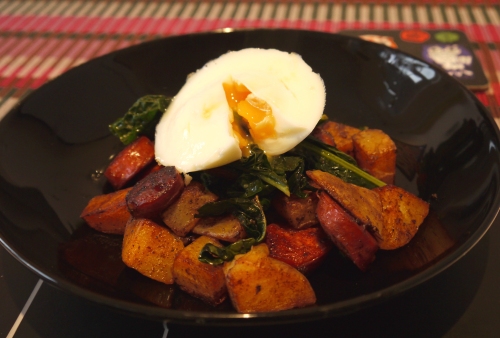
Chorizo, potato and kale pan-fry

In this simple, throw-together recipe the dazzling red oil from the chorizo is soaked up by the potatoes, which go crispy. The kale (preferably cavelo nero) not only makes it a little bit healthy but has a rich, irony taste. A poached egg on top finishes it perfectly. This is a particularly quick dish if you have some cold potatoes sat in the fridge that need using up.

Recipe

Chop your chorizo into bite-size chunks and fry gently in a pan to release the oils. Meanwhile blanch a good handful of sliced kale leaves for 2-3 mins and set aside.

Remove the chorizo from the pan, taking care to leave the oil in there. Add some cold, cooked cubed potatoes and a good pinch of sweet paprika and fry until crispy (you can also add chilli powder at this point if you wish). Try not to move the potato cubes about too much, allow them to get crispy on each side before moving. Once they get crispy, put your poached egg on to cook.

Return the chorizo to the pan, add the kale and warm through. Serve with the poached egg on top and the yolk oozing over the dish.

Read Full Post »

Older Posts »